This is default featured slide 1 title

Go to Blogger edit html and find these sentences.Now replace these sentences with your own descriptions..

This is default featured slide 2 title

Go to Blogger edit html and find these sentences.Now replace these sentences with your own descriptions..

This is default featured slide 3 title

Go to Blogger edit html and find these sentences.Now replace these sentences with your own descriptions..

This is default featured slide 4 title

Go to Blogger edit html and find these sentences.Now replace these sentences with your own descriptions..

This is default featured slide 5 title

Go to Blogger edit html and find these sentences.Now replace these sentences with your own descriptions..

Wednesday, June 26, 2013

How to Auto Update Facebook Wall with Blog RSS Feed

How to Auto Update Facebook Wall with Blog RSS Feed

Share1
If you run a weblog, and waiting in the row of online money makers, then you can try this option to increase your overall traffic. Social media is pretty much everywhere and almost rules the world with some of its widely in use applications. Facebook, Twitter, Digg, Stumbleupon and the list goes on and on. I wrote about 20 famous social bookmarking providers few months back. Email marketing is an old and very effective strategy to gain more traffic. Many newbie bloggers prefer their mode of gaining traffic as social media these days.
When you have 1000 friends in your facebook, you can tell all of them about your recent article by publishing the title of the article, description of it and finally the link to it. It increases the chance of getting the article read by your friends and they do leave a comment based on the way you write it. Rssgraffiti is a facebook application that allows you to update your facebook wall with your favorite blogs recent RSS Feed data. You dont have to copy and paste the link each time after writing an article in your blog or whenever your favorite blog got update.


I prepared a video tutorial to explain the RssGraffiti integration with your facebook account. Its like the same way you do with other facebook application. Allowing the application to update your wall, profile data and so on.
Do leave your comment after adding your favorite blog with your facebook. Have fun !

HOW TO: Get Google Plus Live Feeds Widget ?

Blogging is the hot business in world right now. Everyone needs something and are in search of something. This is obvious because we should directly or indirectly depend on others for any of the resources. So in web you can find anything and everything with more than 1k suggestions. This is possibly done only by Blogging and by the bloggers.
You may also like to Read:
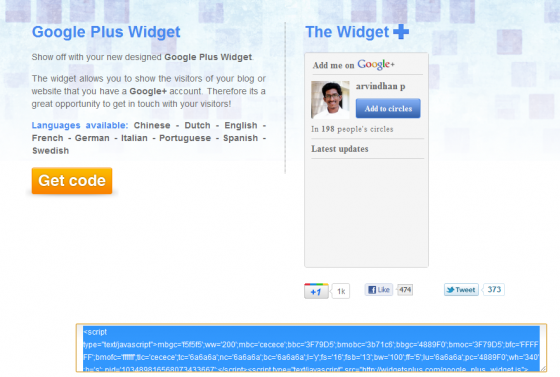
google plusGoogle plus is a highly optimized platform for all users. In this way all the bloggers will prefer using a Google plus widget for their blog/website. This is a common act on everyone who wishes to have the leading, top shared platform in their blog to attract more traffic and grow their network bigger. Most of the bloggers prefer facebook like in their pages so as Google plus widget too. So far the widget available is only with an option to “Add to circle“. The newly released Widget+ is available that displays Google Plus with Live Feed on your blog.

Google Plus Widget with Live Feeds

This code works on all self hosted wordpress blog and websites.
Step 1: Login to your WordPress Dashboard.
Step 2: Visit the Widget+ app link here.
google plus widget
Step 3: You need to add your Google plus ID on the Basic Settings window.
google plus widget
Step 4: You can also customize the Height, Width features on the same window.
google plus widget
Step 5: Once you have completed with the customization, Click on GET CODE button.
google plus widget
Step 6: You will get a code which work on java supported platforms.
Step 7: Copy the code and navigate to your Widget Setting on the Blog’s Admin Panel

Appearance -> Widget Settings -> Text.

google plus widget
Step 8: Place the Text button anywhere on the side panel and paste the code onto it.
Text editor Customizing
Now you can serve your Google Plus Live Feeds to your Blog readers :)
google plus widget
Image Credit: Widgetsplus.com
 Thanks for reading and i hope this have helped you to integrate Google Plus Live Feeds to your WordPress Blog or Website. Please Share this article in Facebook, Twitter and Google Plus to let your friends know about it.

How to Add Real Time Twitter Updates to Your Blog or Website ?

Are you looking for a way to publish your tweets, twitter searches and updates in real time with your blog or website ? . No complex steps to configure it with your site. It takes few clicks to grab the code and paste it in the file, where you want to display your tweets. I was searching in google for some realtime update providing plugin from my twitter account. Surprisingly, Twitter provides the widget service under goodies to embed Twitter Update block in any website or blog. You can see the one in right sidebar of this webpage.
Step 1: Login to your Twitter Account.
Step 2: Navigate to http://twitter.com/goodies/widgets in your browser by typing the URL.
Step 3: Select My Website and you will see four options as shown in the above snapshot.
Profile Widget, Search Widget, Favorites Widget, and List Widget are the four options to generate the twitter box for your website. You can customize the color of the box, header text color, background and so on in the next screen.
In order to add up some list, you have to create one from your Profile  (Twitter.com/#username) page. You can see List -> New List option next to your Profile Icon in the header position. Once done with the changes you can select Test Settings to let the changes you have made to take effect. Finally, click on Finish & Grab Code button to generate the code (js script) to add in your site or blog. Here in the right side bar, i am using Search Widget to display the search results about the term gurusonline in Twitter. Blogger will see a separate icon once the code generated to grab the similar one for their blog. This code can also be used in html, php webpages.
If you are a blogger, then you might have read in many blogs that usage of plugins in a blog must be reduced to improve the blogs loading time and performance. Hence the above procedure may suite well for you as you do configure it in manual method that takes little more time than the widget scheme. Lets have a look at the plugin installation way to configure Twitter Goodies in your Blog.
If you like to add up any widget with your blog, then take a look at the Twitter Goodies WordPress Plugin for quick implementation of the Twitter Widget Box in your blogs Sidebar. Take a look at the Screenshots of the plugin here.
Thanks for the reading.. i hope you have enjoyed the small tutorial to add twitter goodies with your Blogger or WordPress Blog. Have fun !

HOW TO: Use Email Client in Android Mobile ?

HOW TO: Use Email Client in Android Mobile ?

Email clients are one of the best application for accessing multiple emails in a single place. Primary feature of Email clients is we can store the emails in our desktop and we can access to our old emails even we are at offline. It gives a great support for lot of business people that’s why all the leading OS developers have their email client. Previously I wrote about using Google Goggles on your android phone now i’m going to explain you about the best email client for android.
k9 email client

K9 Email Client for Android

1. Go to android market, search for k9 and download the application (download k9 email client).
2. Install the app in  your android phone and go to menu to start the application.
3. Initially you need to enter the email id’s and password you need to use with the email client.
4. That’s all your mails have been configured to use with k9 in your android phone.
k9 email client
5. You can combine all the mail from various mail id’s in a single inbox also in separate inbox.
6. Every mail id will have a separate folder for your easy access so that you wouldn’t confuse the mails from different addresses.
7. These are all the steps to install and use k9 in your android phone.
Thanks for reading and i hope you find this content interesting. You may share this article with your Facebook, Twitter and Google Plus friends to let them know about this great app for android mobile.

HOW TO: Sync Facebook Contacts with Android ?

Sync Facebook contacts with Android mobile right away. Android is not limited to anything in your digital world. If you start thinking creative even sky is not the limit in android. It gives all the possible options to customize everything in your android device. Today I came with an another interesting to sync all the Facebook contacts with your android phone. Instead of manually entering all your contacts just sync with Facebook to import contacts of your friends. Surely it will reduce half the work in typing your contacts.
fb-android
You can do this sync process by using the official Facebook for android. If you don’t have Facebook app download the app from android market. Follow the steps below to sync contacts from Facebook to Android using the Facebook application.

How to Sync Facebook Contacts with Android Contacts ?

1. Open the application Facebook for android and register your Facebook account with the app.
2. Enter into your Facebook account and tap menu option in your android phone.
3. Tap settings from menu and scroll down the screen to view list of options as shown below.
4. Tap on sync options to copy the existing contacts in your android phone.
5. If you tap sync contacts,  you have three more options before you.
6. Tap sync all to import contacts, photos you tagged, your albums, etc.
7. Sync with existing contacts to import your friend’s contact from Facebook.
8. You can select remove Facebook data to clear all the Facebook sync with your android mobile.
That is all, your contacts are now synced perfectly to your Android mobile. There may be little changes when the android os gets some upgrade as the interface changes. We will continuously working and you can see some updated titles soon after the release of new android os. Android makes the process totally simple by adding more features to it, to automate and do tasks simply using the apps from Android Market. Dont forget to give a little search over there and do read the description before downloading it.
Every user who have tried that app also have an option to leave a review about that app. Their experience with it and how well it performed in their mobile phone. So give a time to read that as well to figure out that you are all set to download an app that will just work to complete your task. This is ofcourse a general advice and not specific or limited to this article.
Thanks for reading. These are all the steps in sync contacts from Facebook to your android mobile. You may now share this post in social media sites to help your friends who own Android phone too.

HOW TO: Create RSS Feed for Google+ Profile

Google reader keeps your information desk very much updated. Whenever you open Google reader it will start categorizing things you read already and the things you left unread. This helps most of the users to add the feed for those they follow and keep on their track.
google plus
Even though its not officially supported on Google plus still we can add and enjoy the users from the circles we do prefer or customize. Using this feed you can easily visit the stream of any user and there by stay in touch with their posts and updates.

Add Your Google plus profile to RSS

Step 1: Login to your Google plus account here.
Step 2: Goto your Profile.
Step 3: Copy the URL carrying your User ID.
For example: https://plus.google.com/103489816568073433667/posts
The bold format is your unique user ID for Google plus.
Step 4: Visit the site http://plusfeed.appspot.com/
Step 5: Add your User id to the website’s URL
For Example: http://plusfeed.appspot.com/103489816568073433667
Step 6: It will prompt you for subscription to RSS Feeds and so do that and enjoy RSS feed of your Google plus profile and the preferred Circles you include.


HOW TO: Create a Google Alert for any News

HOW TO: Create a Google Alert for any News

 
Google Alerts are email updates of the latest relevant Google results of your favorite topics, based on your choice of query or topic. You dont have to search for your favorite category specific news and
Some handy uses of Google Alerts include:
  • Monitoring a developing news story
  • Keeping current on a competitor or industry
  • Getting the latest on a celebrity or event
  • Keeping tabs on your favorite sports teams
For Example, Lets take the topic: “Recession 2011″

Step 1: Make sure that you are Logged in to your Gmail account first.

Step 2: Open a new tab (optional). Go to, Google.com and Type the Keyword “recession 2011″

Step 3: On the Left side search pane of Google, select the option as “News”

Step 4: Scroll down to end of the Search results. You can notice: “Keep up to date with these results: Create an email alert for recession 2011, Select that.

Step 5: It will take you to Google Alert service. Select Create Alert.

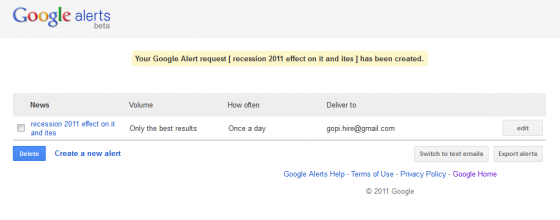
Step 6: It will finally display a notification that your Google Alert has been created.

Thanks for reading and i hope this have helped you in keeping yourself updated. Please do share or like this article in Facebook, Twitter and Google+ to let your friends also know about it.

Saturday, June 22, 2013

FREE -- The correct way to ask for Payoneer Mastercard and get a $ 25 gift


If you have an card Payoneer Mastercard why the waiting Order it now to receive to your home for free.
And new in this: Show the company get a $ 25 gift. Not an exaggeration it is a fact
This is the view the company from its website:


Translation: Once you register invite someone you can obtaining an $ 25 gift you and the person who invited you. What are you waiting for log and call your friends.
Date way to get a card Payoneer Mastercard (I have explained some of the brothers, but not bad to bring her back a new look)

1. Get to the company website: http://www.payoneer-affiliates.com

Put pressure on: sign up


2 We fill in the data needed to fill out the application as in the picture


Note: Data that you Padkhalalha the task to that address which will receive your plastic card, so you should try to be accurate.

3-We complete the data in the second section as in the picture


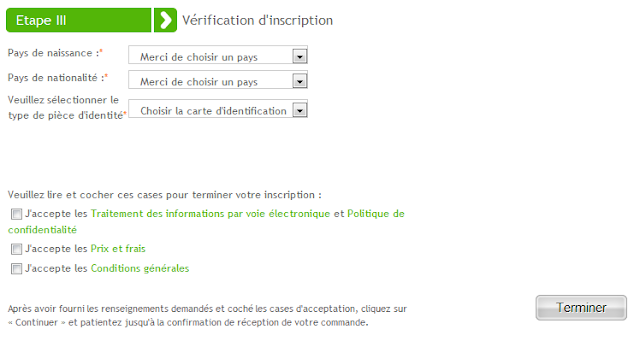
4-Complete data of national identity in the third section as in the picture


Note: You must match the national card numbers with your only true national and your request will not be accepted.

After the completion of the last phase Receive an email recorded by

You'll be directed to a link Lifting

When you provide them with that document you have to wait 1-3 days (depend on the clarity of the national card - Quality) then God willing, you will receive a message telling you that they have been approved for your order and ship your card and provide you with a time of arrival

Friday, June 21, 2013

HOW TO: Protect Mobiles from the Menace of Spyware


In light of a new Android Trojan dubbed “Not Compatible” spreading through compromised Websites, it was high time a guide was provided on how users can boost their security against hacking that takes place through spyware and malware. Although the threat of the Trojan seems to be minimal at this point, security provider Lookout says this is the first time hacked Websites are being used to target mobile devices. Android spyware is not a new problem for android users, neither is the mobile spy aspect of their existence.
Further, Lookout believes the new malware could be used to break into private networks via an infected Android device.
mobile trojan software
The Trojan works by automatically downloading an application from a compromised site through the Web browser, a process known as a drive-by download. The mobile device then prompts the user to install the downloaded app. But for the app to actually install, the unknown sources setting must be enabled on the device; otherwise the installation is blocked. It’s a dangerous form of android spyware that needs to be tackled immediately.
So how does one prevent the online invasion of Spyware and Malware. These spyware and malware programs often change browser settings, alter system files and create new default Web pages. Typically, infected systems are plagued with new tool bars and a constant barrage of popup ads. Scores of useless and annoying Web sites can be added to your “favorites” folders without you having selected them!
Typically, malware will also collect personal information from users systems regarding their Web activities, transferring it to advertising and data-research companies. These companies determine the Websites that users frequent and employ the information to tailor the ads they send to individual users. Several malware programs even regularly update their own program codes on infected computers.
Popup and pop under ads are another great nuisance originated by malware, but perhaps most importantly, malware cases computers and phones to perform poorly. Frequently infected machines freeze up often and at times crash. And those trying to spy on a phone can use this version of a mobile spy to get their things done.
The most common way for malware to work its way into a phone or computer is to piggyback on a free program that is downloaded on the Internet. Most users click I agree or I accept without reading the long and complex agreement that expresses consent to place the malware onto their machines.
mobile malware
These days most users have been warned about not clicking into unknown attachments or accepting downloaded programs. Unfortunately, at this point a wrong click is not all you have to be worried about. Many sophisticated malware programs are now employing the so-called drive-by downloads, All you have to do is visit a popular and presumably safe Website, where malware can automatically latch onto your system. Hackers can also find their way into a user’s computer or phone via spyware and malware, wherein the infecting malware allows for the breaking down of security systems and provide access for hackers to various infected devices.
High-speed Internet users are also at great risk for spyware due to the lack of consumer usage of built-in firewalls, the speed at which spyware files can download and because of the always on nature of broadband and 3G and 4G networks. Once downloaded onto a computer or phone, spyware can be difficult to find, uninstall or disable.
So what protections against malware are available? Certainly, the best time to address malware and spyware is before they find their way onto the respective devices. Several emerging technologies and service providers as well as applications assist users with
  1. analyzing network traffic patterns
  2. monitor the device systems and practices
  3. assess risk exposure
  4. recommend remedial measures
Many anti-malware and anti-spyware products and apps exist, some better than others, and some more expensive than others. There are also excellent free programs. It is important to remember the importance of updating anti-malware and antivirus programs. New malware is designed every day, and whenever a new defensive product or revision hits the market, it is only a matter of time before the malware designers find creative ways to circumvent the software. This continuous game requires users to constantly update their protective softwares.

How to Prevent Virus Infection and Eventual Hacking ?

Be careful with the spam you receive; users should not buy anything promoted in a spam message or reply to spam or click on its unsubscribe link. If a users e-mail program has a preview pane, disable it to prevent the spam from reporting back to its sender.
Users should use one e-mail address for family and friends, another for everyone else. When an address attracts too much spam, abandon it for a new one. Users should also select an address with embedded digits. Also, if a user is getting lot of spam, they should check their Internet service provider’s filtering feature and compare them with those of competitors.
Users should use anti-virus software and heed security alerts e-mailed directly from anti-virus vendors to download antidotes for newly circulating viruses and worms.
Be it a computer or cellphone, users should regularly update their operating systems, Web browser and other major software.
Users should only download and install software and applications from trusted sources. They should also close windows containing pop-up ads or unexpected warnings by closing the entire window, not clicking or tapping on anything within the window.
Author Bio
Jane Andrew is the author of mobile spy and android spyware technology. She provides tips, tricks and news about mobile phone apps. You can also follow her on Twitter @ janeandrew01 to get the latest tips about mobile security.

Best Windows Security Tips to Keep the Performance Great


In the modern world we are too much dependent on computers. Almost all of our work depends on computer and without it we cannot expect our work to be done. We save large amount of useful data in our computers. But do you ask yourself ever that what you are doing for computer security ? Is the data safe in your computer ? Well, talking about the need of computer security I must say that its necessity nowadays. If you want to work fearlessly with your computer, then you must be familiar with the basic tips to secure your PC. In this post I am going to list 5 best security tips for your computer.
windows security
So lets have a look on it.

Use Updated Antivirus

Re check the heading of this point. Use Updated Antivirus. Updated makes the real meaning here. You must have an antivirus installed on your system already as its a common thing nowadays. But one thing that I seen mostly among all the computer users is that they use outdated antivirus. The outdated antivirus can only save you from the old viruses. But you can’t even imagine that new viruses are being developed by some naughty mates everyday. Your outdated antivirus cannot save you from new generation of viruses.

Use Original Software

I seen any times people to search for the crack and all those stuff on Internet to get the software free. Well, let me tel you one thing that in this greedy world you cannot expect anything to come free. So how the software can ?? The software or so called full licensed software that you get from the internet is most probably to come with the viruses and phishing attacks. Original software is the only way to stay safe from such scams. For this you need to lighten your pocket, but it ensures the security of your PC.

Keep Your System Updated

This one is recommended for the computer security. Most times your operating system itself has the answer to all the security essentials. You just need to update and OS will do everything itself. The thing is that to update your OS, you need to have original version of it, then only you can expect the support from your OS developer.

Firewall

Firewall is the recommendation for the security of computer. Firewall can notify about the license of new software. It can help you in installing the right software. Mostly new software contains viruses in it and firewall can protect you from all such incidents. In Fact, Firewall ensures only the licensed and trusted software to be installed on your computer.

Internet Security

The best source of viruses insecure tasks is the internet. So special type of security need to be used when you are using internet. For this you can install the firewall like Comodo or you can also install the internet security software, which you can get easily from your antivirus developer. Internet security software protects your computer from all type of viruses and thus keep your system protected.
Author Bio: This guest post is written by Gupta Sumit aka Sumoni HFG, who is a part time blogger and author at  The Geeks Club and concentrates mainly on iOS Apps and Phone comparision, get in touch with me on twitter @ sumonigupta

HOW TO: Reset a Dell BIOS Password ?


Customers sometimes call in to get help to reset a Dell BIOS password. Some would need a backdoor BIOS password for their desktop computers while others request help for their laptop (also known as portable computers). What many customers do not know is that this information isn’t free. Call Dell tech and you pay a small fee to get the right backdoor password for your desktop or laptop model.
But the good news is that there are other options that people can try.

Other Options Aside from Paying for It

There are other great options for Dell computer owners that won’t require them to pay for anything. In case you need to make changes to your computer’s BIOS, you can choose any of the following options: adjusting the motherboard jumper settings, remove the CMOS battery, use special software, and use an MS DOS command. Take note that not all of these options to recover a BIOS password may work for your particular type of DELL computer.

Changing the Motherboard Jumper Settings

If you call tech support to reset a Dell BIOS password they will usually make you change your jumper settings. In order to do this, you should shut down your computer and remove all the cables connected to it. Next, open the tower case and locate the CMOS jumper. It’s located near the coin battery. It is usually labeled as CLR, CLEAR CMOS, or just CLEAR.
The CMOS jumper will be connected on a three pin series. It will be joining a center pin and one pin to its side. If it connects the center pin to the pin on the right then remove the jumper and use it to connect the center to the pin on the left (or center pin and right pin if the center and left pin combination is the default setting). Keep it at that position for around two minutes and then put it back to its original setting. Close the hatch, plug all the necessary cables, and try to access the BIOS again.

Removing the CMOS Battery

If changing jumper settings sounds too complicated for you then try something that is slightly less complex; something like removing a CMOS battery. If you remember the steps for adjusting the CMOS settings, you located the jumper that is near the flat battery that’s shaped like a coin. That coin-like battery is the CMOS battery. It powers the motherboard’s CMOS memory so that all the settings on the BIOS are saved – including that insane password you forgot!
You can remove the battery using a flat screwdriver. Be careful not to hit anything else when you try to pry it out. Once you have popped it out, remember to leave the battery out for a little over two minutes and then put it back in.
Put everything back including the cables and try to access the BIOS. You’ll get an error message from the computer saying that it can’t access the saved info from the CMOS but you can now access the BIOS to make the necessary changes including a new BIOS password.

Use a Special Software Utility

There are some utility software applications that can reset the password for the BIOS. Some of these applications are free while others will cost you a little bit of money. Your computer should be up and running before you can install and use them.

Use an MS DOS Command

You can use the debug command to recover your password. All you need is to boot your computer to a command prompt. You can use a startup disk that can boot your computer to DOS mode. Type “debug” at the command prompt and then type “o 70 2E” then press enter, followed by “o 71 FF” then press enter, and followed by “quit” and then press enter.

Pay For It

In case none of these methods work, you can call tech support and ask for a backdoor password. It will cost you a good amount of money so you better write it down somewhere so you can use it next time you need to reset a Dell BIOS password.

Kaspersky Mobile Security for Android with Anti Theft Protection


Kaspersky Mobile Security for Android does more than protecting your mobile from latest viruses and malware attacks. It has one power Anti Theft feature that allows you to track the thief through GPS, also secretly take pictures of the thief and upload them to web where you can access via a web based control center and this helps to find the mobile again. Currently Kaspersky Mobile Security is compatible for Android 2.2, 2.3 and 4.0.
kaspersky mobile security
It is not just the smartphone sales that is growing tremendously, on the other side, hacking incidents are growing as well. Hackers started to target mobile phones and the recent statistics shows that 81% of mobile and social networking users are targeted that increases the cyber crime incidents world wide.
Antivirus software has become more essential for PC or Mac and when you own a smartphone, then make sure to check about the hacking possibilities for your mobile os platform as well.
Antivirus only helps you to some extent to protect your mobile phone from web based attacks, viruses, malwares and phishing attacks. It is so common these days that we browse internet via mobile phone for various reasons. We use Apps or the default mobile web browser to check mails every day. Your mobile device is becoming a place where you store your Passwords, Bank account details and other sensitive information. Lets explore the features of Kaspersky Mobile Security for Android.

Kaspersky Anti Virus

Kaspersky Antivirus Protection on Android prevents viruses and spam from infecting your android smartphone when you browse your favorite websites and read mails. The Cloud integration in kasperksy performs scanning when you have downloaded some apps from Google Play or from any third party sources. Kaspersky Antivirus also has a feature to run scheduled scans that allows you to setup antivirus scanning, whenever you find its convenient time to do.

Block Calls and SMS on Android

Another added feature with Kaspersky Antivirus for Android is call and sms blocking facility. You can Block unwanted Calls and SMS Text messages from specific numbers easily.

Privacy Protection

Protect your privacy by defining what others will see and access when they pick up your mobile phone when you are not near. You can hide messages from specific numbers until you are ready to view them. You can activate private mode in Kaspersky Android whenever you wanted. This also has three different options such as Manually, Automatically and Remotely.

Anti Theft Protection

Lost your android smartphone ? If you have Kaspersky mobile antivirus installed in it, then it will be really easy to track stolen android phone than never before. You dont have to file a blind complaint in your nearest police station anymore. Install kaspersky antivirus for android and start submitting the thief pictures taken remotely and uploaded to web, which you only can access using a web application. The GPS Tracking facility also tracks more information when you have marked your android phone as stolen or theft.
Remote wipe feature lets you remotely delete your Pictures, Data and all the other sensitive information you have stored on your mobile phone. This becomes really advanced solution to protect your expensive android smartphone.
Download Kaspersky Mobile Security for android today and bring all the ultimate features that you wanted for long time to protect you from Viruses, Malwares, Spywares, Web Attacks and Theft.
Thanks for reading and please drop your views and suggestions in the comment box below. Also you may like us at Facebook, Twitter and Google Plus to get more news and updates right in your social news feed. Have a great day.

HOW TO: Paint Like A Pro With Your iOS devices ?


Are you interested in painting ? Want to paint your home walls and accessories on your own ? Here is an app called “How To Paint Anything” from a famous magazine “Better Home and Garderns“. They have recently launched this app for iOS users to learn painting on their own. This app is available for iPhone, iPad and iPod Touch. Using this application you can learn painting different type of accessories and walls in your home and office. This is a best app for people who are interested to try something new.
how-to-paint-anything
“How To Paint Anything” app has a complete set of tutorials for painting different types of walls and accessories in your place. It has 50+ step-by-step painting tutorials which gives a clear explanation with detailed videos and presentations. The tutorials are divided into six different categories based on the different types of painting. Let’s have a detailed look at the functions and specifications of this app below.

How To Use “Paint Anything” App on iOS Devices ?

You can purchase the app from iTunes for $0.99 and install it in your device. The same app can be used across all the three devices (iPhone, iPad and iPod Touch). Once you install and open the application, as I said before you have six different categories of painting tutorials on the home screen. You have tutorials for painting walls, accessories and different types of objects in your home. Even you have tutorials to transform your plain curtain into a custom window treatment.
Once you are done with the tutorials you can create a shopping list from that app itself. For instance, you are interested in doing wall art and you like a tutorial from the wall art section, you can just drag that particular tutorial to shopping list category on the top of the page. Once you did that you can see a list of items required to do that wall art in your place. So not only the tutorials, also you can know about the requirements of raw materials to complete that project. You can easily add and remove the items in your shopping list and take a printout of them directly from the app.
paint-anything-ipad
Apart from the six categories of the application, you have a separate section for getting painting ideas and choosing colors for your work. These tips and suggestions are from the experts of “Better Homes and Gardens” Magazine. These tips and color choice will give a professional touch in your paintings. Also you can add notes and save custom projects inside the app which will let you create a new design on your own.
These are the features and functions of “How To Paint Anything” app for iOS devices. There is no announcement regarding app for Android devices. Hope it will be available soon. Try this app in your iOS device and share your experience with us in the comment box.

HOW TO: Use Spotlight in Mac OS X ?


When you start using the new Mac OS organizing data and applications is not a big deal. You can easily find and access the data. But when the applications and the internal storage increases it is hard to manually search and find everything you need. In order to get the desired information quickly on your Mac we have a feature called “Spotlight“. It is a quick search feature, which helps to search the entire mac applications and data within a fraction of second. This instant search technique starts searching the entire computer within a moment you start typing the word on the search box.
spotlight
Spotlight is a one of the best desktop search technology, which display the search results in an organized way. When you search for a particular keyword it will search in all the applications, files, folders, documents, emails, contacts, etc. Not only on the keywords, you can use spotlight for searching specific file extensions in your Mac. For example, you can search for files with an extension of .JPG from the spotlight search which will display all the .JPG files on documents, emails, files, folders, applications, etc. Also you can type the file name along with the extension to narrow down your search.

How To Effectively Use Spotlight On Mac ?

Spotlight is an excellent search feature available for most of the Apple’s default application on Mac. Finder on Mac use the same spotlight features to search contents and application in the internal hard drive. Not only in Finder it is also available for system preferences and various other applications on Mac. So you can easily search and find the content belongs to that particular application instantly using this search feature.
The Spotlight search is kept in the desktop for the convenience of users. Instead of going to that specific application to search the content you can easily search from the desktop. For example if you want to search a mail you can do that from desktop using Spotlight. Just type the email id or the subject or the name of the person to find that particular mail right from your desktop.
spotlight-search
You can adjust the settings of Spotlight search in System Preferences of your Mac. Otherwise you can click on the Spotlight preferences option at the end of every search results. Using Spotlight Preferences you can change the settings on displaying search results. Also you can reorder the categories of search results in Spotlight preferences.
Once you finished typing the keyword, if you didn’t get your desired content you can use “Show All in Finder” option to see the complete search results for that particular keyword.
You can use the “Command + Space bar” button to open the spotlight search in your desktop. In spotlight search, if you want to search some specific areas like Home folder or a particular user account, just click one of the button below the toolbar to tell Spotlight where and what to search. These are the spotlight search techniques to find the desired content on your Mac instantly.
Use Spotlight on Mac OS here after to access files and do more with it. Try this feature on  your Mac and share your experience with us in the comment box. Thanks for reading, have a great day !

HOW TO: Encrypt External Hard drive Quickly on Mac OS X ?


Today external disks has got huge amount of memory as well as become ultra thin for better mobility. So the trend has changed to more usage of external disks than the internal hard drives on the computer. Especially in Mac, we have a default application called Time machine which helps us to backup user data to an external drive periodically. So we have to use the internal hard drive only for installed applications and use the external drive for backup. Here comes the actual problem, when you backup, there may be some confidential or sensitive data stored along with other application and user data. To prevent any misuse, it must be protected with high encryption algorithms.
Here we have one such data protection mechanism that keeps all your data to be stored in the backup safe and security with some good encryption technique in the backup taken from Mac.
mac-lion-hdd-encription-logo
Encryption is nothing but making your external disk password protected. So whenever you connect the disk to a PC or Mac it will ask password to access the drive. Whether it’s a 2GB SD Card or a 2TB external drive you can easily encrypt on Mac OS X. Let’s see the steps to encrypt the external disc.

HOW To Encrypt External Drive On Mac OS X ?

Step 1: Connect the external drive to your Mac. Go to finder and right click on that particular drive, choose Encrypt external disk name.
Step 2: Once you did that a Window will pop up and ask you to set a password for that particular drive. It is recommended to have a strong password for you external disk. So that nobody can’t easily guess the password and access it without your permission. A strong password must be a combination of alphabets, numbers and symbols. If you don’t have any idea about creating a strong password you can use web services like Strong Password Generator, PC Tools, etc, to create a strong password with desired number of characters. Minimum of 8 characters is recommended.
encrypt_3_1
Step 3: Once you enter the password don’t forget to give a valid password hint. Because if you forgot the password it is the only source to recall it. Make sure you remember the password or else make a note of your password on applications like 1Password, etc. If you forgot the password that is all you will lose the data.
Step 4: Once you click the encrypt button, the process will take place based on the storage capacity. If it is a 2 or 4 GB USB Stick the process will be quick but if you encrypt some TB’s of storage the process will take more time. The ratio of high storage devices will be around 1GB per minute.
Once you done with the encryption and disconnected, next time when you connect the drive, just enter the password and access it. These are the steps involved in encrypting an external disk. Try this on your Mac and share your experience with us in the comment box. Thanks for reading.

HOW TO: Reset Facebook Password ?


Common people who use lot of online accounts often experience this problem of forgetting their password. Even though Facebook has become a part of your life and business, sometimes you may forgot the password. Changing password for your accounts monthly once is a good security practice. So the chances of forgetting or not able to remember at times, is possible. In that situation you have no other option and you got to reset your Facebook password. Resetting the password is simple and also the process is very similar like you do with other online accounts. In Facebook you have three different ways to reset a password. Either you can use your email, or a security question or an one time password feature.
reset-facebook-password
Resetting facebook password is simple but you got to confirm that you are the owner for the account and facebook will not reset it until you pass the verification steps. Quite a strong security practices they want you to follow in order to secure your account. Here we will see different steps that shows how to reset facebook password and login back to your account.

Three Ways To Reset Facebook Password

Using Email or Phone number

It is the most commonly used technique to reset the password for most of the online accounts. To reset the password we are going to use the email account which you have registered with Facebook. First what you have to do is, click on “Forgotten Your Password” link below the password box on the Facebook’s log in page.
fb-pwd-reset
Once you did that, you need to enter your Email id or Facebook username  or the phone numberregistered with your Facebook account to verify which account you need to reset the password. As soon as you enter any of the information, your profile name and the profile picture will be displayed to confirm that you need to reset the password for your account. If the account shown is correct, then click on the profile to receive the password reset link in email or in your mobile phone. Using that link you can reset the password of your Facebook account and create a new one.

Using Security Question

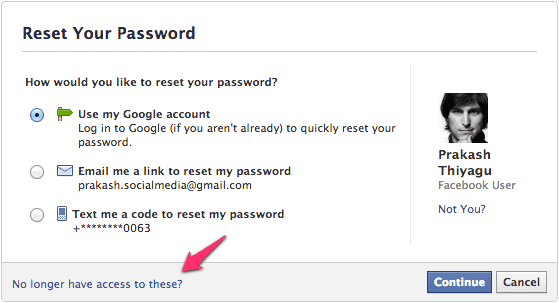
Using Security question to reset the password will be the second option in case you don’t have access to that particular email account. In order to use the security question Click “Forgotten Your Password” link on the Facebook home page then type your email. After that you will be redirected to a new window in that select an option “No longer access to these ?” under the list of email addresses provided. Once you did that follow the instructions to answer your security questions which will help you to reset the password.
fb-security-question
Note: Using Security question to reset your password will not let you open the account immediately. For security reasons it will take maximum of 24 hours to gain your account back.

Using One Time Password

For getting one time password, you need to register your mobile number with your Facebook account. So that you can request Facebook to send the OTP to your mobile. To get an one time password on your mobile you need to type “OTP” in your mobile and send the text to “32665“. Within few seconds you will receive theone time password to access you account and the new password will expire in 20 minutes. This one time password feature will also be helpful when you need to use your Facebook account in a public WiFi or in apublic computer. Right now this feature is available only for U.S Region and the company has announced that soon this feature will be available for all the users on Facebook.
These are the three different ways to reset the password of your Facebook account. In order to get rid of forgetting passwords use applications like “1password” to remember and access your passwords securely. Try these techniques to reset the password and share your experience with us in the comment box. Thanks for reading. Have a great day !

How to Create a Facebook Page – Simple Guide


Facebook, worlds no 1 social networking site allows you to create pages for your local business, place, company organization, brand, product and so on. Facebook has grown to a level like ocean, where nearly700 million users are using it across the world. There is no such website or social networking site used by this many people before. People make friends, share their views, interests and sometimes they find their life partner through social networking sites.
Facebook ofcourse, plays its part in creating new love birds and also separating many couples if something wrong we did with our facebook updates.
facebook page

What is Facebook Page?

Facebook pages are so helpful in promoting a brand or building a community to discuss on certain categories. This makes facebook one of the unique social networking site. Any one who have Facebook account may create a facebook page and let his / her friends like it. Facebook Wall update, Photos, Comments, and Tabs are features of every facebook page.
The Facebook page creator can control any parts of the page to create a Facebook Landing Page and do some business convertion, generate more loyal fans and so on. Webmasters are finding this facebook page as a very helpful feature to promote their services, and build better fan page for their clients today.
Technically a Facebook page is a customizable home page of our Brand or Business on Facebook that offers us to make popularity and interact with users in many new ways. Facebook page comes with News Feed, pre-installed applications such as photo uploader, rating, flash player and more.
Before you need to create Facebook page, all you need is a Facebook Account. If you don’t have one, then create a facebook account here.
Once done, visit Create Facebook page to start with the steps below.

Step 1: Create Facebook Page

You can Create a page for Local business, Place, Company, Organization, Institution, Brand, Product, Artist, Public Figure, Band, Entertainment, Cause and Community. For Example in this tutorial i am going to Create Facebook Page for DailyTUT website.
Make sure you are selecting the right brand to create your facebook page. This is the first step and important one, as your page going to get listed under this category.

Step 2: Choose Your Facebook Page Category

After selecting the Brand category, select Sub category as Website Title. Fill the following details about the website. Once done click on “Get Started” to move to final step of page creation.

Step 3: Configure your Facebook Page

You are done and your facebook page is ready now. Its time to configure your facebook page logo, info and make it look better for letting people join.

Step 4: Tell Everyone about Your new Facebook Page

Click “LIKE” to your own page first and Click Edit page button in top right corner.

Step 5: Customizing Facebook Page

Facebook Page can be edited through admin panel which consists of Manage Permissions, Basic Information, Profile picture, Featured, Resources, Manage Admins, Apps, Mobile, Insights and Help. (screen shot below). There are lots of options here to customize the Facebook page, but now we are going to see only important options we should know.

Step 6: Facebook Page Permissions

In the option Manage Permissions, we can change the default landing page, allow users to post in the page. Choose as per your requirement to suite your facebook page.
and go to Basic Information tab and fill the basic info about your FB Page and click “save changes“.

Step 7: Facebook Page Logo

Your logo represents your Brand. So upload your logo here to suite the facebook page that will be visible in left top corner. Facebook allows to upload maximum size of 200×600 pixels.
However, Facebook do not allow background images like Twitter, Myspace and other services. So we left with no option than Facebook Page Picture.

Step 8:

In Manage Admins option you can add page admins to the page and in Featured option you can add those admin profiles in Page for fan viewers. In Apps option you can add any Application from Facebook Application directory, Photos, Videos, Questions, Links comes in default. and last but not least, Facebook Insight option is to monitor our page daily likes, new fans, views of the posts and everything.
Everything is Done. Leave your newly create facebook page url below. Now go to your facebook page, Suggest the page to all your friends and start posting. Happy Facebook-ing.
You may follow DailyTUT on Twitter or like us at Facebook to get more Facebook news, and updates.